Lab 01: Hello World Kernel#
In this lab, we will explore the basics of booting from a disk on a traditional x86 (Intel) BIOS-based system. We will use an emulator for one of the original IBM PC machines, and attempt to boot, print “Hello, World!”, and halt the system.
Development Environment#
Because support for development environments is inconsistent across operating system platforms, we will make use of Dev Containers in Visual Studio Code. This makes use of lightweight virtualization to provide a uniform environment across systems. Virtualization provides a mechanism for your computer to run additional operating systems simultaneously with minimal wasted hardware resource usage.
Download and Install Docker#
Docker provides lightweight virtualization that we will use as the backend for our development container. Follow the download and installation instructions for your operating system:
After following these instructions, launch the Docker Desktop application. Once this software is running, you should be able to create lightweight virtual containers. In your preferred terminal application, try this out:
$ docker run --rm hello-world

Unable to find image 'hello-world:latest' locally
latest: Pulling from library/hello-world
e6590344b1a5: Download complete
Digest: sha256:d715f14f9eca81473d9112df50457893aa4d099adeb4729f679006bf5ea12407
Status: Downloaded newer image for hello-world:latest

Hello from Docker!
This message shows that your installation appears to be working correctly.

To generate this message, Docker took the following steps:
 1. The Docker client contacted the Docker daemon.
 2. The Docker daemon pulled the "hello-world" image from the Docker Hub.
    (amd64)
 3. The Docker daemon created a new container from that image which runs the
    executable that produces the output you are currently reading.
 4. The Docker daemon streamed that output to the Docker client, which sent it
    to your terminal.

To try something more ambitious, you can run an Ubuntu container with:
 $ docker run -it ubuntu bash

Share images, automate workflows, and more with a free Docker ID:
 https://hub.docker.com/

For more examples and ideas, visit:
 https://docs.docker.com/get-started/
Lab Report
Take a screenshot of this output to include in your lab report.
Visual Studio Code Setup#
We will use Visual Studio Code to write code and interface with a lightweight container with the software packages that we need for this lab.
Perform the following steps to set up your environment:
Create a directory for all of your lab work.
Install Visual Studio Code.
When installing on Windows, check any box that indicates “install code command in PATH” or similar.
Launch Visual Studio Code.
On MacOS, type
command + shift + pto bring up the command pallette. Start typingshelland select “Install ‘code’ command in PATH”. This will let you launch a copy of VSCode opened to a specific directory.
Install the
ms-vscode-remote.remote-containersextension. You can find extensions under the “Extensions” icon on the left sidebar (It looks like four boxes with one box flying away).Choose
File > Open Folder, and select the folder you created before.
Configure Project and Dev Container#
Next, we will set up the container environment in which we can develop code for
the original IBM PC. It is a 16-bit Intel architecture, so modern compilers
(e.g., gcc or clang) are not going to work.
In the following instructions, everything provided is precise. File names, directory structures, and capitalization must match exactly. To set up the development environment, follow these steps:
Create a directory in the root of your project folder called
.devcontainer. On *nix operating systems (e.g., Linux, MacOS, UNIX, etc.), the leading “dot” on a file name makes the file hidden by default.Inside the
.devcontainerdirectory, make a file namedDockerfile. This file tells Docker the steps to create a container. Place the following in this file:FROM ubuntu:latest RUN apt-get update && export DEBIAN_FRONTEND=noninteractive && \ apt-get install -y \ bcc \ coreutils \ curl \ git \ hexedit \ make \ nasm \ tar \ unzip \ xxd \ zip && \ apt-get clean && \ rm -rf /var/lib/apt/lists/*Also in the
.devcontainerdirectory, make a file nameddevcontainer.json. Add the following to this file and save it. This describes the file that will be used to build the container and the extensions to install into VSCode.{ "build": { "dockerfile": "Dockerfile" }, "customizations": { "vscode": { "extensions": [ "ms-vscode.cpptools-extension-pack" ] } } }
In the root directory of your project, create a file named
.gitignorewith the following contents. If you use git to store revisions of this lab, it will ignore certain files that are generated by the compiler.# MacOS files .DS_Store # Prerequisites *.d # Object files *.o *.ko *.obj *.elf # Linker output *.ilk *.map *.exp # Precompiled Headers *.gch *.pch # Libraries *.lib *.a *.la *.lo # Shared objects (inc. Windows DLLs) *.dll *.so *.so.* *.dylib # Executables *.exe *.out *.app *.i*86 *.x86_64 *.hex # Debug files *.dSYM/ *.su *.idb *.pdb *.lst # Kernel Module Compile Results *.mod* *.cmd .tmp_versions/ modules.order Module.symvers Mkfile.old dkms.conf
Reload the VSCode window. You can do this by typing
control/command + shift + pand searching forreloadto find “Developer: Reload Window”. When the window reloads, look down in the bottom left corner. You will likely see something that saysDev Container: Reopen in Container. Click this and choose the option that has the same name as your project folder. This tells the Dev Container how to interface with your project.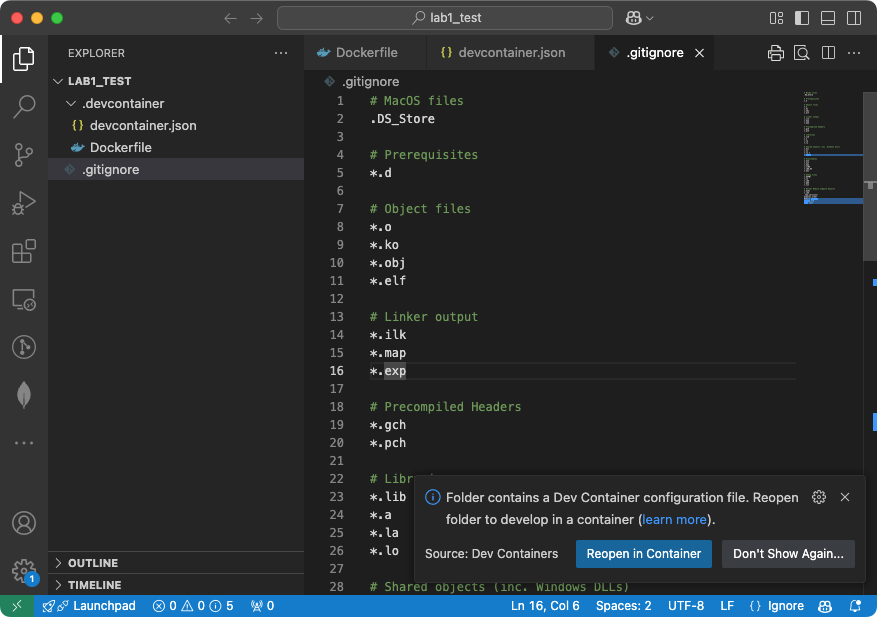
You should see a notification that the container is being built. This will take a while the first time you do it.
Open the built-in terminal in VSCode. This will open to the directory of your project. You can open the terminal using the View > Terminal menu or typing
ctrl + `(on all platforms).Test that you now have access to software in the dev container by running the following commands Note the commands are on the lines starting with
$. The remaining lines show expected output.$ nasm -v NASM version 2.16.01 $ bcc -v bcc: version 0.16.17 Usage: bcc [-ansi] [-options] [-o output] file [files].
Emulation Environment#
In this lab, we will be using 86Box, which can emulate early IBM PC systems. The setup is slightly different on PC and MacOS. Follow the directions for your specific operating system below and then continue to Building a Simple Kernel.
Windows Setup#
Download the latest release of 86Box for Windows. Make sure you select the appropriate download for Windows.
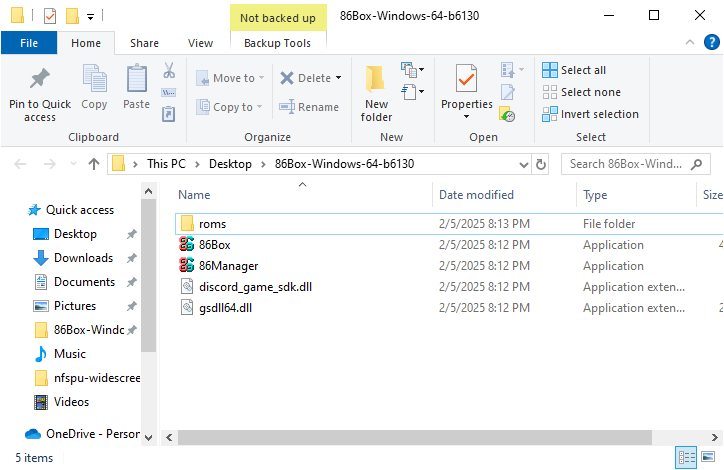
Unzip this file to somewhere that you can find it. It will have the 86Box application as well as some supporting files.
Download the corresponding release (look at the version numbers!) of the ROMs for 86Box. This time, you want the source code zip file. Extract this into the same folder that contains the 86Box application. Rename the extracted folder
roms.Download the latest release of 86BoxManager and unzip the application into the same directory as 86Box.
Verify that your file layout matches the one shown below:
Open 86BoxManager. You may need to click through some security messages to run the software. Once the software starts, it will give you an error message about missing configuration files. Note that the message tells you this will happen on the first run.
Click
Settings. ClickBrowsenext to the 86Box path field. Select the folder you created with all of the 86Box files. Save these settings.Click
Add. Give the machine a reasonable name (e.g., Lab1) and check the box to configure the virtual machine now. Confirm these settings by clickingAdd.In the configuration window that now appears, change the following settings (the remaining settings may be left at their default values):
Machine
Machine: [8088] IBM XT (1982)
Memory: 128 KB
Storage Controllers
FD Controller: PC/XT Floppy Drive Controller
Click
OKto finish configuring the virtual machine.Select the virtual machine and click
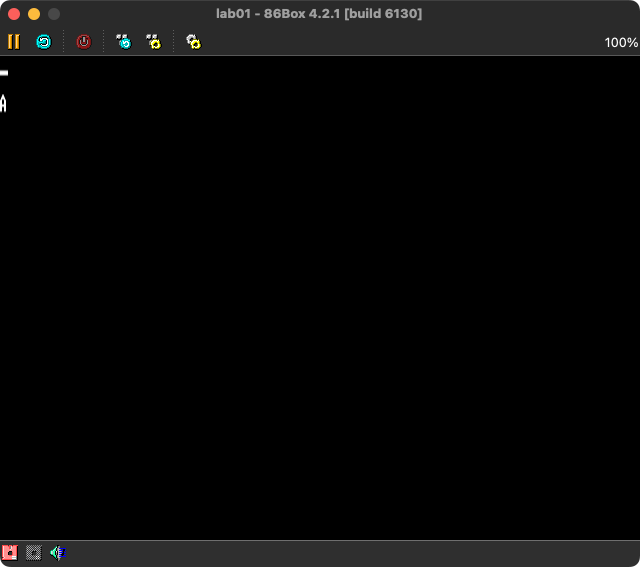
Start. In theViewMenu, SelectForce 4:3 Display Ratio.Congratulations! Your virtual machine should boot to a BASIC prompt (because there is no operating system).
Lab Report
Take a screen shot of this BASIC prompt for your lab report.
MacOS Setup#
Download the latest release of MaxBox. Unzip the App and drag it to your Applications folder.
Launch MacBox. You may need to allow the application to run by opening the Security and Privacy settings in MacOS Settings.
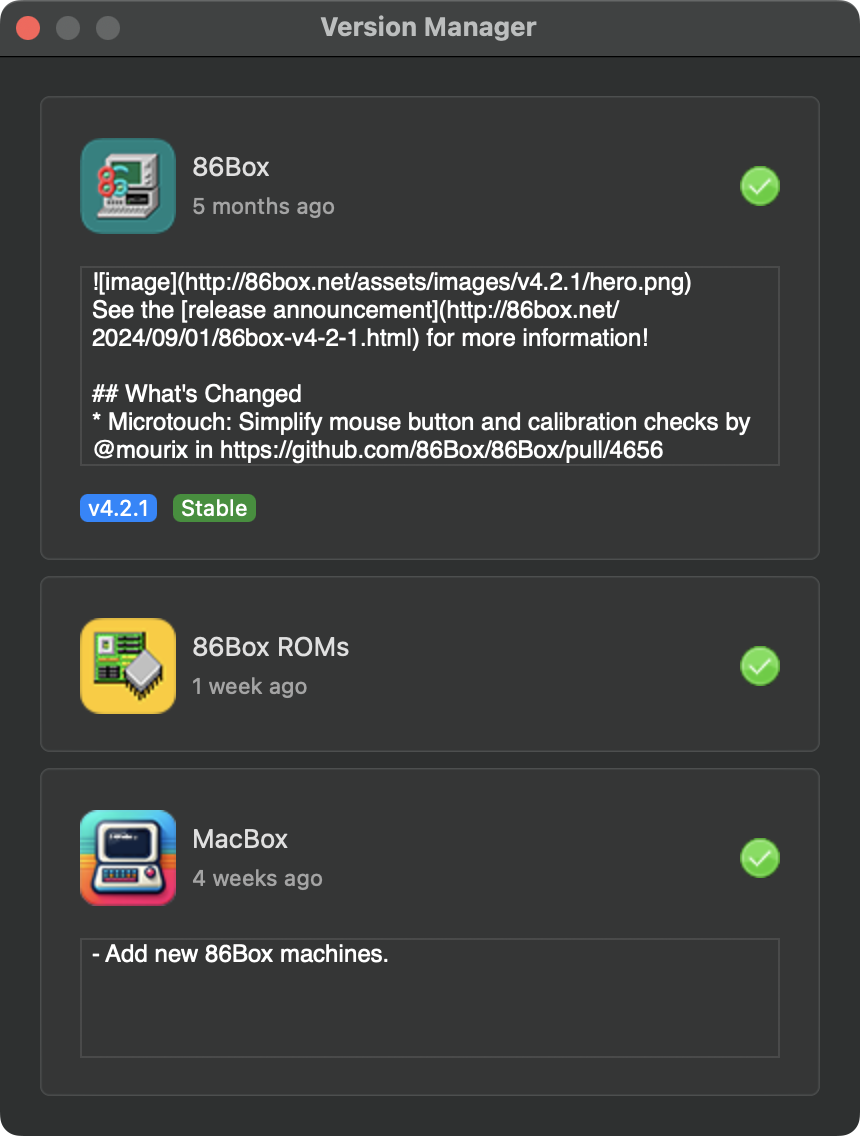
From the
MacBoxmenu at the top of your screen, selectSettings. Verify that the updates channel is set to stable.Click on the message in the bottom-left corner stating the 86Box is not installed. In the window that pops up, choose to install 86Box and the ROMs. All three sections will have check boxes when finished.
Click the plus sign to add a VM. Give the machine a reasonable name (e.g., Lab1) and click
Add.With the VM selected, click the Wrench/Screwdriver button to open the configuration settings.
In the configuration window that now appears, change the following settings (the remaining settings may be left at their default values):
Machine
Machine: [8088] IBM XT (1982)
Memory: 128 KB
Storage Controllers
FD Controller: PC/XT Floppy Drive Controller
Click
OKto finish configuring the virtual machine.Select the virtual machine and click
Start VM. In theViewMenu, SelectForce 4:3 Display Ratio.Congratulations! Your virtual machine should boot to a BASIC prompt (because there is no operating system).
Lab Report
Take a screen shot of this BASIC prompt for your lab report.
Building a Simple Kernel#
When a computer turns on, it goes through a process called booting (short for bootstrapping). After performing a power-on self test (POST), it will begin executing a small bootstrapping program contained within the BIOS (basic iinput/output system), which is stored in read-only memory (ROM) on the computer. The BIOS bootstrap program reads the first sector of the boot disk and loads it into memory. This first sector of the bootdisk contains a program called a bootloader. After the bootloader is copied into memory by the BIOS, processor execution jumps to this code and begins running.
Get the Starter Files#
A set of starter files is available for this lab assignment. Download them into
your development environment and untar them. (tar is the tape archive
utility, which provides a format for packaging up files.)
You do this completely with the terminal:
$ curl -OL https://url/to/osb2b_lab1.tar.gz
$ tar xzf osb2b_lab1.tar.gz
Bootloader#
We will be booting 86Box from a 360K floppy disk image. A 360K floppy disk has 720 sectors of 512 bytes. Thus, the bootloader is required to be exactly 512 bytes long (one sector) and be loaded into sector 0 of the boot disk image. In addition, the last two bytes of sector 0 must be 0x55 followed by 0xAA, which indicates to the BIOS that the disk is a boot disk. Since not much can be done with a 510 byte program, the purpose of the bootloader is to load the larger operating system from the disk to memory and start it running.
Since a bootloader has to be very small and handle such operations as setting up
registers, it does not make sense to write it in any language other than
assembly. Consequently, you are not required to write a bootloader in this lab;
one is supplied to you in the file bootload.asm. You will, however, need to
assemble it and install it into sector 0 of your boot disk image.
Lab Report
Use an AI tool such as ChatGPT or Copilot to help you explain the contents of
bootload.asm. Why is 0xAA55 written at the end of the assembly file when the
last two bytes are to be 0x55 followed by 0xAA (see above)?
Assembling the Bootloader#
To install the bootloader, you first have to assemble it. The bootloader is written in x86 assembly language understandable by the NASM assembler. To assemble it, use the command:
$ nasm bootload.asm
The NASM assembler generates the output file bootload, which contains the
actual machine language program that is understandable by the computer. You can
look at the bootload file with the xxd utility. You will see a few lines of
numbers, which are the machine language instructions in hexadecimal. Below that
you will see a lot of 00s. Near the end, you will see the magic number 55 AA
indicating that it is a boot sector.
Hint
Pipe the output of xxd to less so that you can scroll around in the file.
Recall, you can quit less by pressing the q key.
$ xxd bootload | less
Disk Images#
We will use the UNIX dd utility to create disk images. The first thing we’ll
do is create a disk image filled with all 0’s. To do this, use the command:
$ dd if=/dev/zero of=disk0.img bs=512 count=720
The above command will copy count=720 sectors of bs=512 bytes/sector from
the input file if=/dev/zero and put it in the output file of=disk0.img. 720
is the number of sectors on a 360K floppy, and /dev/zero is a UNIX special
file that contains only zeros. You should end up with a 360 KB file named
disk0.img that is filled with zeros.
We will also use the dd utility to copy the bootload program to sector 0 of
the disk0.img disk image. To do this use the command:
$ dd if=bootload of=disk0.img bs=512 count=1 conv=notrunc seek=0
The additional parameters to dd indicate that we move seek=0 sectors before
writing and that we do not truncate the image after writing (conv=notrunc). If
you look at disk0.img now with xxd, the contents of bootload are contained
in the first 512 bytes of disk0.img and the rest of the file is filled with
0’s.
In the next part of the assignment you’ll write your “Hello World” program and
put it into sector 3 of disk0.img so that it runs when 86Box is booted.
A Hello World Kernel#
For this lab, the kernel should contain a main method that simply prints out “Hello World” in white letters on a black background at the top left corner of the screen and then enter an infinite while loop. You must write your program in C and save its source code in a file named kernel.c.
When writing C programs for an existing operating system such as MacOS, Linux or
Windows, you can use functions such as printf or putchar that display text
on the screen (similar to System.out.println in Java or print in Python).
When these functions are compiled, they use a system call to the operating
system, which ultimately handles the display of the characters. But, since we
don’t have an OS yet (you haven’t written it!), we can’t have system calls.
Thus, there is no way to compile calls to functions such as printf and
putchar that rely on system calls for their operation.
Because you cannot use the printf or putchar functions, you will have to
write the characters you want to display directly to video memory. Video memory
starts at memory address 0xB8000. Every byte of video memory refers to the
location of a character on the screen.
The most basic configuration of the graphics card is text mode, which is
designed to display ASCII text. You are provided with a function,
initVideo(void), in kernel.asm to switch the emulated graphics card into
text mode. You should call this function as the first non-variable-declaration
line of main. In text mode, the screen is organized as 25 lines with 80
characters per line. Each character takes up two bytes of video memory: the
first byte is the ASCII code for the character, and the second byte tells what
color to use to draw the character. The memory is organized line-by-line.
Thus, to draw a white letter ‘A’ on a black background at the beginning of the third line down, you would have to do the following:
Compute the address relative to the beginning of video memory:
Since on line is 80 characters long, the beginning of the third line down would be \(80 * (3 - 1) = 160\). We then also want to add the horizontal position to this. Since we want it at the beginning of the third line, we are adding 0.
Multiply that relative location by 2 bytes / character and add it to the starting address of video memory:
\((160 + 0)*2 = 320\), which is the same as 0x140 in hexadecimal
Adding on the starting address of 0xB8000, we get 0xB8140.
Write 0x41, the ASCII code for the letter ‘A’, to address 0xB8140.
ASCII: 65, 0b01000001, 0x41
Write the color white (0x0F, see below) to address 0xB8141.
The 16-bit C compiler that we are using (bcc) provides no built-in mechanism
for writing bytes directly to memory. To allow you to write bytes to memory from
your kernel, you are provided with an assembly file kernel.asm that contains
the function putInMemory. This function has the following signature:
/**
 * Insert a byte into memory at a given segment and offset
 *
 * @param segment the memory segment for the data (this is multiplied by 0x10)
 * @param offset the distance from the start of the segment where memory should
 *               be written
 * @param b the byte of data to place in memory
 * @return void
 */
void putInMemory(int segment, int offset, char b);
To write the character ‘A’ to address 0xB8140, you could call:
putInMemory(0xB800, 0x0140, 'A');
putInMemory(0xB800, 0x0141, 0x0F);
Alternatively, we can let C do the number conversion:
putInMemory(0xB800, 320, 'A');
putInMemory(0xB800, 321, 0x0F);
Our full program so far looks like:
extern void putInMemory(int segment, int offset, char b);
extern void initVideo(void);

int main(void) {
   initVideo();
   putInMemory(0xB800, 320, 'A');
   putInMemory(0xB800, 321, 0x0F);

   // loop forever
   while (1);
}
Warning
When adding functions to your kernel, add prototypes at the top of the file and
then put your function definitions after main. The main function must be
first in the kernel source code. You will see really odd behavior
otherwise.
Lab Report
With the help of an AI tool, see if you can explain why this might happen. It relates to what the bootloader does.
Compiling the Kernel#
We will use the bcc compiler that generates 16-bit machine language code.
Unfortunately, bcc is fairly primitive and requires that we use early C
syntax. The most significant aspect of which is that all local variables used
in a function must be defined before any statements in the function.
To compile the kernel, use the command:
$ bcc -ansi -c -o kernel.o kernel.c
The -c flag tells the compiler to just compile the source code as is without
adding in operating system library code (such as printf). The -ansi flag
tells it to use standard ANSI C syntax and the -o flag tells it to produce an
output file called kernel.o.
The kernel.o file is not your final machine code file, however. Recall, that
you are using the putInMemory and initVideo functions from the kernel.asm
file. For your C program to be able to call these, you will also need to
assemble the kernel.asm file and then link it with your kernel.o file.
To assemble the kernel.asm file use the command:
$ nasm -f as86 -o kernel_asm.o kernel.asm
The -f flag tells NASM to output the assembled code in the format produced by
the as86 assembler (which is what bcc uses), and the -o flag specifies the
object file for the assembled code.
Next, we need to link our kernel code with the assembly code (so that they can call each other):
$ ld86 -o kernel -d kernel.o kernel_asm.o
The file kernel is your program in machine code. To run it, you will need to
copy it into the disk image at sector 3, where the bootloader is expecting to
find it. To copy the kernel file to sector 3, use the command:
$ dd if=kernel of=disk0.img bs=512 conv=notrunc seek=3
Simplifying Compilation#
There are a number of steps to create a floppy disk image for the 86Box
emulator. To simplify the process, we can make use a build script to perform
these steps for us. The Makefile provided with this lab does just this.
To use it, just run make from the directory where your lab files are located.
If you would like to delete all the build files, run make clean.
Booting Your Kernel#
In 86Box, click the floppy disk icon at the bottom left of the screen and choose the option to select the option to choose a disk image. Navigate to the directory containing your disk image that you built and choose it.
Now, click the reset button in the top menu bar to reboot the virtual computer.
Once the system POSTs, you should see your A on the beginning of the third line!
Lab Report
Take a screen shot of this for your report.
Finish Hello World#
Now that you have the basics down, rewrite your main function to output
“Hello, World” on the third row of the screen in while text.
Lab Report
Take a screen shot of this for your report.
Extend the Kernel#
Create a function
putCharinkernel.cthat displays a character in a specified color at a specified location on the screen. It should have the following type signature:
/**
 * Insert a character on the screen with the given color at the position
 * (row, col)
 *
 * @param c the character to insert
 * @param color the color of the character. The lower nibble is the foreground
                color and the higher nibble is the background color.
 * @param row the 1-indexed row where the character should be placed
 * @param col the 1-indexed col (horizontal position) where the character
              should be placed
 * @return void
 */
void putChar(char c, char color, int row, int col);
Modify your main method so that, in addition to printing “Hello World” in
the upper left corner of the screen, it uses the putChar method to display
“Hello World” in white on a red background at the center of the screen. The
video memory’s color codes are shown below. The background color goes in the
high-order nibble of the byte for the color, while the foreground color goes
in the low-order nibble of the byte. For example, 0000 0001 = 0x01 will
produce blue text on a black background.
Hint
Declare an enum with the color names. By default enumeration values count
up from 0.
Hex Value |
Binary Value |
Color |
|---|---|---|
0x0 |
0b0000 |
black |
0x1 |
0b0001 |
blue |
0x2 |
0b0010 |
green |
0x3 |
0b0011 |
cyan |
0x4 |
0b0100 |
red |
0x5 |
0b0101 |
magenta |
0x6 |
0b0110 |
brown |
0x7 |
0b0111 |
light gray |
0x8 |
0b1000 |
dark gray |
0x9 |
0b1001 |
light blue |
0xA |
0b1010 |
light green |
0xB |
0b1011 |
light cyan |
0xC |
0b1100 |
light red |
0xD |
0b1101 |
light magenta |
0xE |
0b1110 |
yellow |
0xF |
0b1111 |
white |
Lab Report
Take a screen shot of this for your report.
Create a function
putStrinkernel.cthat displays a string in a specified color at a specified location on the screen. It should have the following type signature:/** * Insert the null-terminated string on the screen with the given color at * the position (row, col) * * @param str the null-terminated string to insert * @param color the color of the character. The lower nibble is the foreground color and the higher nibble is the background color. * @param row the 1-indexed row where the first character should be placed * @param col the 1-indexed col (horizontal position) where the first character should be placed * @return void */ void putStr(char * str, char color, int row, int col);
Each successive character in the string should be printed one column to the right of the previous one. If the end of a line is reached, the next character should appear on the following line. No characters should be printed past the end of the screen. Instead, the text should wrap around to the first line.
You can iterate over every character until you see the end of the string, rather than needing to get the string’s length (which can be error-prone).
Modify your
mainmethod so that it also uses theputStrmethod to display “Hello World” in black on a light cyan background in the lower right corner of the screen, wrapping around to the top line.Lab Report
Take a screen shot of this for your report.
Lab Report#
Collect your notes into a well formatted report that details your progress through this lab assignment. Begin the report with a brief abstract that describes the purpose of this lab (in your own words) and what you were able to achieve.
In the remainder of the report, be sure to address the callouts throughout this lab description. When screenshots or images are requested, provide a brief caption describing what is being shown.
Acknowledgements#
This lab is adapted from materials first developed my Margaret Black (at Bridgewater State University as of 2025). The initial project was described in a SIGCSE 2009 publication [1]. This lab also borrows from an adaptation developed by Sara Sprenkle at Washington & Lee University [3].